Busy, exhausted classroom teacher, RIGHT HERE! In all my years of teaching, I keep telling myself one of these days I will have everything I need and I will walk out the door at the end of the day every day because I finally have it all together! Well, reality is, we keep getting more and more responsibilities piled on us! One of the things I DO have though that helps me tremendously are SORTS! I keep all types of sorts in my centers that we can use again and again! They are perfect for interventions, group activities and individual centers. I just laminate them so my students can use them over and over.
I also love using seasonal sorts so I can use them for multiple months! These winter themed division sorts are for my exclusive e-mail subscribers. I love sending freebies, free classroom ideas for organization and management, and sneak peaks at new classroom resources. Subscribe below so you can enjoy this plus many more freebies coming to your inbox!
Subscribe today to receive this FREE winter themed division sort for your classroom and many more ideas coming to your inbox every month!
I always wanted to do a classroom transformation, but with all my responsibilities, I JUST DON'T HAVE TIME! Anyone else???? I really, really wanted to do something that was simple and yet would make impact in my classroom. Sooooo.......I came up with an inexpensive, easy to make plan to welcome my students and bring some joy and fun to our learning. I made a cozy fireplace for my students to read by and to display some of my winter decorations my students have given me over the years.
Supplies needed: 5 copy paper boxes, brick bulletin board paper, scissors, packing tape, regular clear tape, and about 45 minutes!
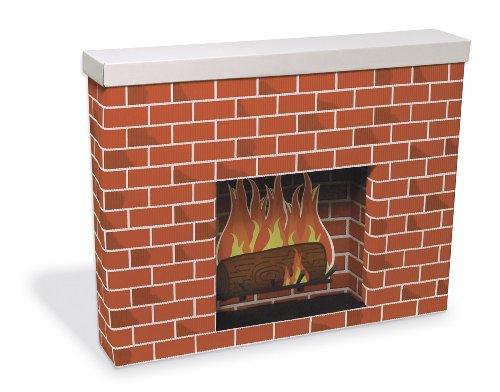
If you don't want to make your own, I have a pre-made fireplace option you can purchase on Amazon below! Scroll down.
Step 1: Beg your custodian and secretary to save 5 copy paper boxes for you (or a box of similar size). As you can see in my picture, I also used a Scholastic book box and another box that just happened to be almost the same size. Also gather all the above supplies so you don't have to stop and look for them as you create.
Step 2: Lay your boxes flat on the floor in the fireplace shape you desire and go crazy with the packing tape (or masking/duct tape). No one will see the tape, so use a lot and don't worry about the wrinkles. You want to make sure that your pieces are all sturdy enough to hold up your decorations later on, so especially wrap a LOT of tape around that top middle piece. I flipped my boxes around as I taped to make sure I taped ALL 4 sides generously.
Step 3: Lay your boxes flat on the floor again and lay the brick bulletin board paper on top making sure that it drapes over both sides, and all the excess is at the top of the boxes Step 4: Set your fireplace up and use packing (clear) tape to tape the sides around the back of the boxes and the bottom. Now you are ready to fold the top of the paper down on top of the fireplace mantle. Just fold it like a present. I didn't do any extra cuts. Just fold and tape down in the back and on the sides. (where the "mantle" is).
Step 5: Now you are ready to cut out the fireplace area! I simply found the center and cut a slit in the paper up to the "mantle" box. Then I slid my scissors under that middle "mantle" box to cut it so I could tape the two flaps on the "inside of the fireplace." I did not worry about covering the bottom inside of the "mantle" box.
Step 6: Bam! Finished! You can see in the picture with my sweet 10 year old son helper that the paper wrinkled a bit in spots, but I seriously didn't worry about it. I did smooth out a few spots and taped them down in the back, but since I will just be leaving this up for a few months, I didn't stress over a few wrinkles (much like I don't stress over a few wrinkles on my face now either)!
You can see that I had a HUGE air conditioner unit in my classroom, so this worked out perfect because I won't get in trouble for covering up the vent! Haha! (Even though I really don't know why it would matter since we aren't running our air conditioners right now.....)
I am soooooo excited for this mini classroom transformation because as you can see, I decorated for Thanksgiving, Christmas and I will change it over in January to a winter theme. I may even keep it up for February! My students have already enjoyed reading by the fireplace. For a bit of extra fun, you can see I put a box of Holiday books in a box next to the fireplace and I added a cheesy, cheap and fun fire with logs. Directions on that are below.
Since my students can't all fit around the fireplace, somedays I also display a live fireplace on my Smartboard and turn off the lights. It is usually bright enough for my students to read since we have several windows. Here is a link to a Christmas themed fireplace with crackling noises on YouTube, but you can just search for "fireplace" on YouTube and you will get tons of options.
If you don't want to make your own fireplace, but you like the idea of purchasing a pre-made fireplace, this is such an amazing option! It is a free-standing cardboard fireplace that would cost just a few dollars more than building your own!
To make the fake fire and logs, I used one paper bag from the grocery store to make 3 quick logs. I cut the bag into 3 pieces, rolled them up and stapled them. I wadded the paper a bit to make them look more rustic, stapled the three logs together and threw in some red, orange and yellow torn construction paper. I just simply stapled the three colors to the middle of the "logs" here and there. They aren't beautiful, but it looks so cute!
As a third grade teacher, I can
tell you distributive property of multiplication can be a frustrating topic to teach, especially if your
curriculum thinks your students are going to magically learn this in one
day. Nope! The curriculum books usually fail miserably introducing the concept of distributive property, so I am going to give you ALLLL my tips to help make it a success in your classroom! I teach this concept over two to three days
and I continue to review it every once in a while over the next few weeks (or
else I might as well not teach is at all since they will forget it in a day).
Here is how I break it down.
Day OnePlans
Where
Do I Start?????
I start with giving my students a
pre-printed array that is a fact I know they won’t have memorized like 5x16. I ask my
students to work with a partner to figure out the product. I give them two minutes to come up with an
answer. Some of them will count the
tiles and get it right, but we will end up with several answers.
I will then ask them to try to
solve another ridiculously hard multiplication problem (ex. 17 x 4). I let them use dry erase boards, beans,
pencil paper, color tiles or whatever they want to try to solve it. We share our answers (as we usually have
several different answers – some right and others wrong). We also share “how” we tried to solve it and
we also talk about how it was time consuming to draw pictures of all of
it.
We will spend the majority of the
rest of the class period trying to solve tougher multiplication problems using
arrays and breaking them apart.
How
to Break Apart Arrays
I show my students HOW to break
apart arrays into simpler facts they already know. I display this on my SmartBoard or
show them with color tiles. For larger
facts (14 x 5) I will show them how to split 14 into 10 and 4 and for smaller
facts (3x9) I will show them how to split the 9 into 5 and 4. I always encourage them to find numbers they
are fast at (5’s 2’s 10’s, etc.) This
step of knowing how to break apart a number into smaller numbers that they know
the multiples for is a critical step.
We use dry erase boards, paper
arrays that we cut apart and color tiles that we break apart with our pencils
into smaller multiplication facts. When
they break apart the arrays I have them write the two smaller multiplication
facts underneath, write the two products and then add them. This helps them make the connection to WHY weusedistributiveproperty.After some practice and they
understand WHY we break apart the arrays, we are now ready to use distributive
property on those larger facts.
Distributive
Property
I end the day by working with the
students to take what they learned to make an anchor chart. Since drawing is not my thing, I cheated and
made an anchor chart on the computer to print.
We put it together in class. It
shows all the proper steps that we will be practicing on paper tomorrow!
The printables that are shown are available for purchase in this Distributive Property of Multiplication resource pack, but they can also be easily made using grid paper, index cards, paper protector sheets, and a good old fashioned pen and paper. It's how I make most of the additional resources in my classroom (until I have enough time to make it on the computer).
Day
Two Plans
Review
with Manipulatives
I start the day with a quick review
of breaking apart our multiplication facts using anything – beans, pencil and
paper, color tiles, dry erase.
Then we move right into using
Distributive Property dry erase mats and pre-printed multiplication fact
cards. This helps me differentiate with
groups and individuals when needed.
My biggest tip here is to have the students CIRCLE the factor they are
going to break apart. It is a great
visual reminder.
I also print out some grid paper
and have my students cut out arrays.On
the top of the book we show the steps and on the bottom of the paper, we
physically cut apart the array.The mini
books are helpful because they are only looking at one “problem” at a time and
they don’t tend to get overwhelmed.Making the cuts take some planning so I encourage them to write out
their two factors and circle the one they are breaking apart before cutting the
array.
Color
the Arrays
Anothermethodweusetopracticeistocolorcodeeverything!Asyoucan see in the picture, we write
the factors in the large array in pink and decide which one to break apart by
circling it. Then we use two different
colors to show how we broke it apart both in the array and in the number
sentence.
It is my sincere hope that after reading this post, you have gained some new inspiration and confidence for teaching the distributive property of multiplication. You have the tools (beans and your ingenuity) to make it work, but if you want some printable resources (because let's face it - teaching is tiring), you can find loads of help in this Distributive Property of Multiplication resource pack.